The elevator mechanic, having registered a PIN code in LiftOff mobile, can access LiftOff Commander at: https://liftoff.braxos.com
The principle BLE beacon technology supported by LiftOff is a quarter-sized battery-powered BLE beacon whose estimated lifetime is currently a little more than one year. This beacon can be programmed using a desktop or laptop running Google Chrome and LiftOff Commander. It may also be programmed using the mobile application, but the initial beacon definition must occur within Commander.
![[Note]](images/note.png) | Note |
|---|---|
| Commander must currently be used on a desktop or laptop device. Support for small-sized media (i.e.: phones, tablets) is in progress. |
To login into LiftOff Commander, enter the aforementioned URL. The elevator mechanic will be presented with a two-factor login screen:

The phone number and PIN code should be the values supplied to LiftOff Mobile. Once supplied, clicking “Send Push” will result in a push notification sent to the mobile device. The verification code can then be used to authenticate to LiftOff Commander.
Once authenticated, the elevator mechanic can choose which building requires configuration by
selecting the building from the site drop-list in the navigation bar at the top of the page.
If the site desired is not in the list, please contact <[email protected]> for Deployer access:

Next to the building selection control is a Security Toggle:

When this toggle is enabled, the Floor Access rules are in effect, and the destinations available
to a rider is limited to what that rider is authorized to travel to. When this toggle is disabled,
all floors are public, and any rider may travel anywhere. It is often useful to disable this during
deployment, when beacons are being deployed and tested, and enabled at the end of the testing
process when the building is being turned over to the building administrator.
Currently, only those with the Deployer role or Support role see and can manipulate the security toggle setting.
Adjacent to the user profile avatar is the LGA Connection Status icon. This indicates whether or not the gateway appliance is successfully communicating with the cloud. If the appliance is communicating successfully, a connected cloud is rendered:

Hovering over the icon will display the date and time the connectivity was established. If the appliance
is not communicating with the cloud, a broken cloud icon is displayed:

If the appliance is in the disconnected state, LiftOff calls will fail and users will receive a notification
that their request to dispatch an elevator has given up after twenty seconds. Possible reasons for why the
appliance may not be able to communicate with the cloud include:
Poor cellular coverage, if cellular connectivity is used
The appliance has been powered off
The appliance is in a suspended state
The appliance is configured to ccommunicate with the cloud using the building network, and the building network has lost internet connectivity
The appliance is configured to ccommunicate with the cloud using the building network, and new firewall rules prohibit the appliance from communicating with braxos.com
| Note |
|---|---|
Users may still receive timeouts waiting for a car assignment even though there is
no issue with appliance connectivity to the cloud for several reasons:
|
Before beacons can be enabled for car calling or kiosk unlocking, the elevator mechanic must define to LiftOff the Elevator Banks (a.k.a Car Groups) that will be participating in the LiftOff deployment. The exercise of defining the Elevator Banks is to:
Give each bank a human-identifiable name (e.g.: “A” or “1” or “East”). Optionally, a display label that will be displayed to the LiftOff user when a car is called can also be supplied.
Define the floors in the bank. This includes the virtual kiosk ID (also known as a “DEC” or “display panel” or “reader ID”) that LiftOff should use when placing a call at that floor, as well as the security value and direction to use as the destination for users wishing to ride to the associated floor.
Additionally, the elevator mechanic must indicate in LiftOff Commander what special privileges or features have been enabled in the group, such as VIP, so that LiftOff can allow the building to manage who may place a car call with those special privileges enabled.
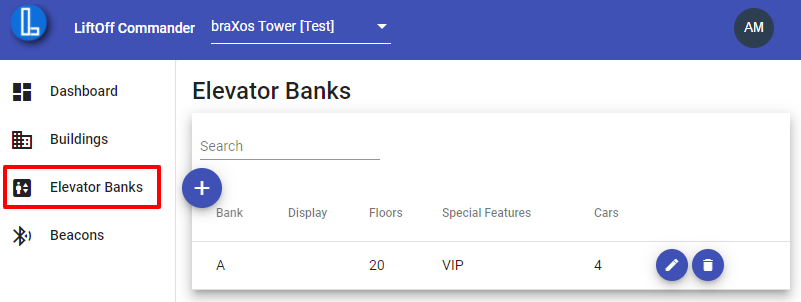
To add or edit Elevator Banks, choose the Elevator Banks menu item from the side navigation. A table of elevator banks will be displayed. Each elevator bank that will be LiftOff-enabled must be defined in the system. To add an elevator bank, click the “+” button. To edit an existing elevator bank, click the pencil icon on its row:
When the “+” (to add) or pencil (to edit) buttons have been clicked, LiftOff Commander displays the Elevator Bank dialog:
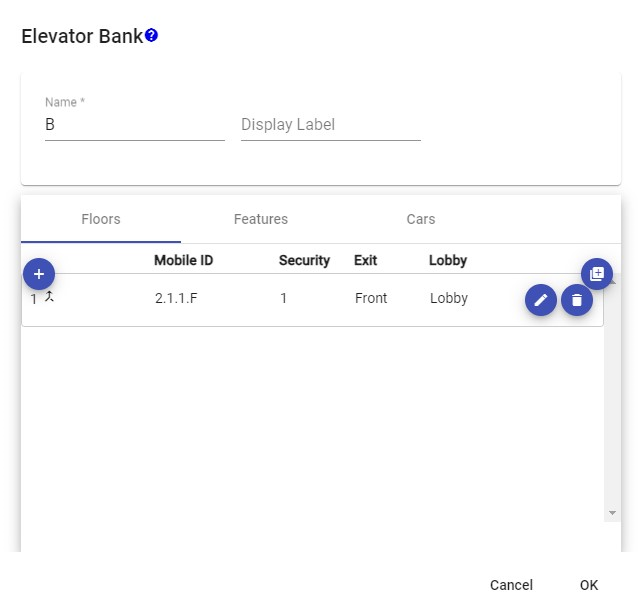
Name. The Name field is required to define the bank to LiftOff. The name is displayed to the building staff when defining floor access rules and calling privileges.
Display Label. The Display Label is an optional field, that, when supplied, is displayed to the LiftOff user when a call is placed.
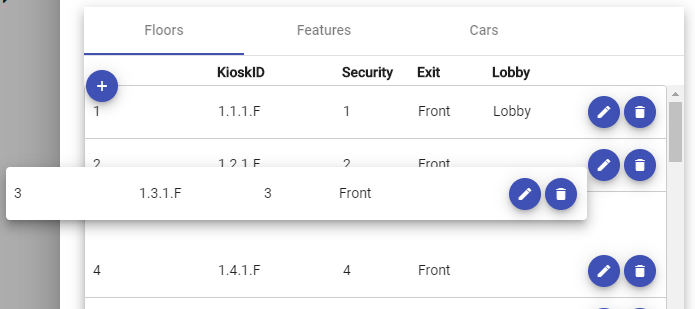
In addition to the Name, the set of floors and features must be defined. To add a floor, click the “+” button at the top of the table. To edit a floor definition, click the pencil on its associated table row:
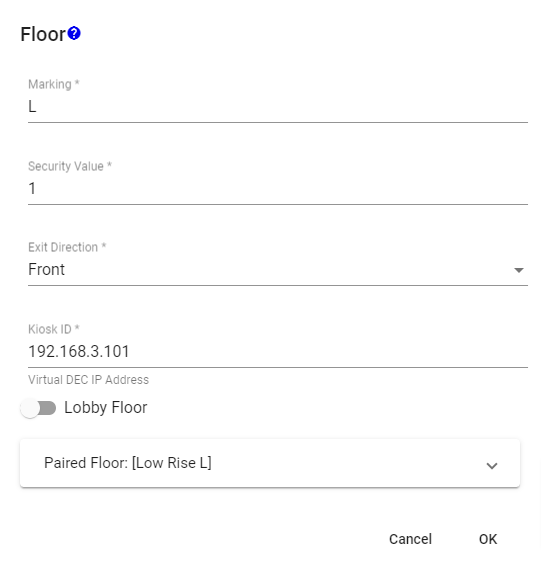
After clicking the “+” or pencil button, the Floor dialog appears. The following fields are used to define the floor to LiftOff:
Marking - this is what is displayed to the LiftOff rider, as well as to the LiftOff Commander building staff. This value should be the same as it is on the elevator kiosks / DECs / display panels.
Security Value - this value indicates to LiftOff what it should send when requesting a car to take a rider TO this floor. The security value is often the landing number, but can differ based upon how the elevator controller is configured and whether or not there are missing floors.
Exit Direction - this value indicates to LiftOff what it should send to the elevator controller as a destination direction for this floor. If a floor has both a front exit and a rear exit, two different floors should be defined (e.g.: 2 Front, 2 Rear).
Kiosk ID - this value indicates the Kiosk ID that LiftOff should use as the source floor panel identifier when issuing the car call. This Kiosk ID must be defined to the elevator controller so that the controller knows where to dispatch the car for pick-up. In some platforms, this value may require the elevator mechanic to create a “virtual” display panel in the system software. If an actual, in-use Kiosk ID is supplied, LiftOff will interoperate with that kiosk, and the display panel will show the LiftOff car allocation. This behavior is not desirable, as non-LiftOff users will be confused at the kiosk’s behavior, but could be configured temporarily for debugging deployment issues.
Lobby Floor - this value indicates whether or not the floor is a “Lobby” floor. A lobby floor is a floor which is always accessible, per code, and is displayed in LiftOff as the top option for QuickLift elevator calls.
Paired Floor - this optional value allows the elevator mechanic to indicate that, when the user is within proximity of beacons associated with either this floor or its pair, LiftOff should present destinations from both elevator banks simultaneously to the user. To pair a floor, expand the Paired Floor panel, and choose the elevator bank and floor which ought to be paired. Once the dialog is dismissed, a paired icon is displayed next to the floor:
To remove a pairing, click the Trashcan icon in the expanded Paired Floors panel.

Instead of adding each floor definition independently, multiple floors can be added at once. By clicking the double-plus button ("++") at the top of the table, a dialog will be displayed which gives options that allow for multiple floors to be created at once:
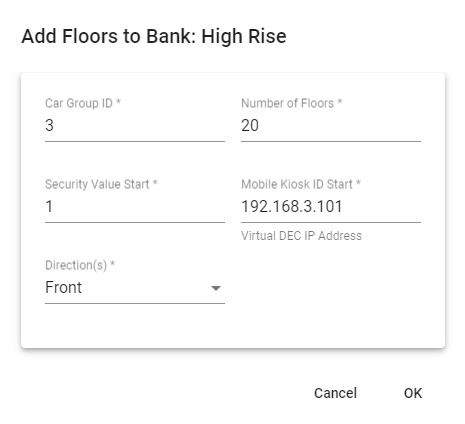
You will be prompted for the following values:
Car Group ID - this field identifies which car group the set of floors ought to be added to. It is important that this value matches the car group that is currently being edited.
Number of Floors - this value indicates the number of floors to create. If a floor already exists with the same security value, it will be preserved. Valid values are between one and 127, inclusive.
Security Value Start - this value indicates the starting security value for the floor. This value is the value sent to the controller when a destination is selected. For each floor created, this value is incremented by one. The batch creation process will also default the floor marking to the same value as the security value.
Mobile Kiosk ID Start - this value should indicate the first mobile kiosk ID that should be used on the first floor created. The system will increment this value appropriately for each floor created in-batch.
Direction - this value indicates whether the floor has a front-of-car entrance or a rear-of-car entrance or both. If
Bothis selected, then two floors will be created for each Number of Floors specified. For example, if Number of Floors is three, and the Direction isBothwith a Security Value Start of1then the following floors would be created: 1, 1R, 2, 2R, 3, 3R.
After tapping OK, the floors will be merged with any existing floors already defined for the elevator bank. Until OK is tapped on the elevator bank's dialog, changes will not be saved.
The order in which the floors are displayed in the Elevator Bank table mirror how they are displayed in LiftOff. The order can be changed by dragging and dropping a floor:
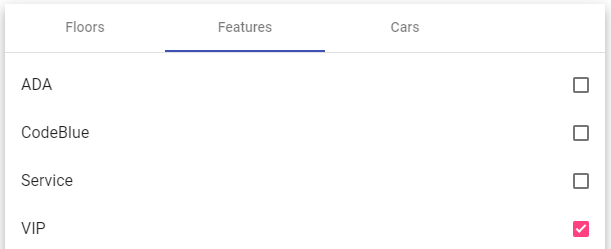
In addition to floors, special features must be defined to LiftOff. Special features, if desired by the customer, must first be defined in the elevator controller configuration. Then, the feature can be made available for the building to manage access to through the Features tab of the elevator bank dialog:
Once the configuration of the Elevator Bank is complete, click the button to save the changes.
To make a Feature which has been configured in the elevator controller available to LiftOff, click the checkbox associated with it. Once ticked, the feature becomes available for the building to manage via the membership mechanism. The building will be able to define groups and schedules whereby members of those groups can have the option of placing a car call with special privileges, such as VIP.
By default, LiftOff will display the Physical Car No. (e.g.: 1, 2, 3, etc.) returned by the elevator controller to the rider. If something other than the Physical Car No. ought to be displayed, the elevator mechanic must supply a mapping between the Physical Car No. and the Car Display Label:
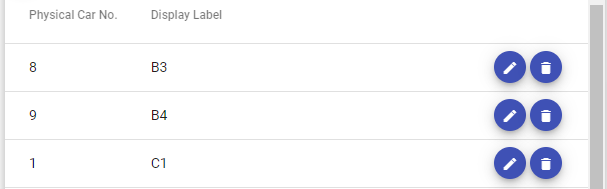
In this example, when Car 1 is allocated, the rider will see “Proceed to Car C1”.
Beacons act to identify a LiftOff user as being physically present at a particular elevator bank on a particular floor, and, if used in conjunction with kiosk unlocking, at a particular kiosk.
| Note |
|---|---|
| It is recommended that two beacons be programmed per landing, per group and placed around eight feet above the floor where the hall call buttons are using double-sided tape. The beacons should be out-of-reach of passengers. |
Every beacon is programmed with a Secret Key. The Secret Key is used by LiftOff to uniquely identify the beacon around the world. The Secret Key is never transmitted by the beacon. Instead, a time-based hash using the secret key is transmitted, which is then validated by LiftOff.
In addition to the Secret Key, the following additional properties must be configured by the elevator mechanic:
Elevator Bank - the bank with which the beacon group is associated
Floor Marking - the floor on which the beacons have been placed
Car Calling - whether this is a beacon used for calling a car, and, if so, how close must the rider be to the beacon before being able to do so
Kiosk Unlocking - whether this beacon is used for unlocking a kiosk, and, if so, what is the ID of the kiosk that ought to be unlocked when the rider is within one meter of the beacon. E.g.: the DEC (e.g.: 192.168.1.10), display panel (e.g.: 0.0.F), or kiosk ID (e.g.: 1.2.1.F) ID. The value is contingent upon the elevator manufacturer.
To add or edit beacons, click the menu item in the left-side navigation:
A table of beacons will be displayed (if any). The table displays the battery health,
whether car calling is enabled, kiosk unlocking is enabled, and, if so, the ID of the kiosk
that will be unlocked when a LiftOff enabled mobile device enters into range.
The "+" button is used for adding a new beacon to the site. The "++" button is used to add multiple beacons to a site with a single click. Once clicked, the "++" button will display the Add Beacons dialog box:
After choosing the elevator bank, the deployer may then choose the number of beacons for the
system to generate per floor and the naming pattern that LiftOff will use in naming the beacon.
The default naming mechanism is to prefix the beacon name with the first three
letters of the elevator group, automatically upper-cased, followed by the floor marking, followed
by a sequence number contingent upon the number of beacons to be autogenerated. The elevator
mechanic can substitute more relevant information. For example, the elevator mechanic may want to indicate
"North" and "South" as the beacon suffixes, or "A/C" and "B/D" to indicate the cars between which
the beacons will be placed. If no prefix is supplied, the beacon name will be the floor marking
followed by the suffix.
Unlike the single beacon creation process, the batch process assumes that all beacons will be Car Calling beacons.
| Note |
|---|---|
| The process will not generate new beacons in excess on floors where beacons already exist. For example, if zero beacons exist on Floor 1, one beacon exists on Floor 2, and two beacons exist on Floor 3, the adding of beacons in batch would add two beacons to Floor 1, one beacon to Floor 2, and no beacons to Floor 3. |
In addition to the "+" and "++" command buttons, the following buttons allow further information and modification of beacon configuration:
![]() Secret Key – used to view the secret key that has/will be written
to beacons in the group, and generate a new key, if desired. This can be useful in using
an iPhone to simulate a beacon.
Secret Key – used to view the secret key that has/will be written
to beacons in the group, and generate a new key, if desired. This can be useful in using
an iPhone to simulate a beacon.
![]() Download LiftOff – used to program a beacon.
Download LiftOff – used to program a beacon.
![]() Edit – used to edit the properties of the beacon, including its
car calling and kiosk features.
Edit – used to edit the properties of the beacon, including its
car calling and kiosk features.
![]() Delete – used to delete a beacon
Delete – used to delete a beacon
The details of each command are:
Secret Key. When a beacon group is added, a Secret Key is automatically generated. Viewing the secret key is rarely required. However, if the command button is clicked, the following dialog is displayed:
| Note |
|---|---|
| The Secret Key can be used with LiftOff Mobile beacon simulation diagnostics to test LiftOff without an actual beacon. The Generate command can be used to generate a new Secret Key for the beacon. If a new secret is generated, the beacon MUST be re-programmed for the beacon to function. |
Download LiftOff. By clicking the Download LiftOff command button, the elevator mechanic can program each beacon with the beacon’s Secret Key. See the next section for programming and deploying the physical beacons.
Edit. Clicking the “+” command button or the beacon group edit pencil command launches the Beacon Dialog:
Delete. The command will, after confirmation, remove the beacon from the site.
Once a beacon has been defined for each interaction point with LiftOff users, the beacons can then be programmed. To “program” a beacon is to record in its RAM the Secret Key used by LiftOff to confirm the physical location of the LiftOff user. If the Secret Key is changed for a given beacon, a re-programming of the beacon is required.
| Note |
|---|---|
| While it is possible to program beacons after they are placed on the wall using LiftOff, it is recommended to initially program all the beacons with Google Chrome on a laptop at at a desk. |
To program a beacon, click the command button, which will launch the Beacon Programmer stepper:
The first step of programming the beacon requires that the beacon be reset, by removing
and restoring the battery. Once complete, advance to the next step by clicking the
button.
The second step requires that the beacon is Paired to the BLE-enabled, Google Chrome
device used to program the beacon. Once paired, click the
command button to turn on the red LED. In the presence of multiple beacons, this allows the elevator
mechanic to physically confirm the beacon that is about to be programmed. Clicking the
command button again turns off the red LED and enables
the Next button, allowing the mechanic to proceed to the next step.
Click the command button to download LiftOff
code to the beacon. The command button will turn red until programming completes. If
the beacon is a Car Call beacon, the transmission range can be selected. Once complete,
the command button becomes available to proceed to the next step.
Click the button on the dialog to complete the process.
| Note |
|---|---|
| Until the button is clicked, Google Chrome will be paired with the beacon, and the beacon cannot be used with LiftOff. This pairing can be verified by the presence of the Bluetooth logo in the LiftOff Commander tab of Google Chrome. |
Once complete, the beacon’s programming can be verified by launching LiftOff Mobile in proximity of the newly programmed beacon to see what it reports as the LiftOff user location.
If a beacon does not function after programming, or if it cannot be Paired during Step 2, it may have to be reset to its factory defaults. To reset the beacon to its factory defaults:
Remove the battery
Wait five seconds
Holding down the single, small, black button on the beacon, restore the battery
Continue holding down the button while the blue and green LED flash
Continue holding down the button until the red LED flashes five times
Release the button
| Note |
|---|---|
| Removal of the battery from the beacon causes the beacon to cease functioning. After a battery is restored, the beacon will need re-programmed in order to acquire the time-of-day. |