At any time, you can click your (on iOS) or choose the menu item (on Android) to:
Update your profile
Manage AutoLifts
Verify your email address
Sign Out
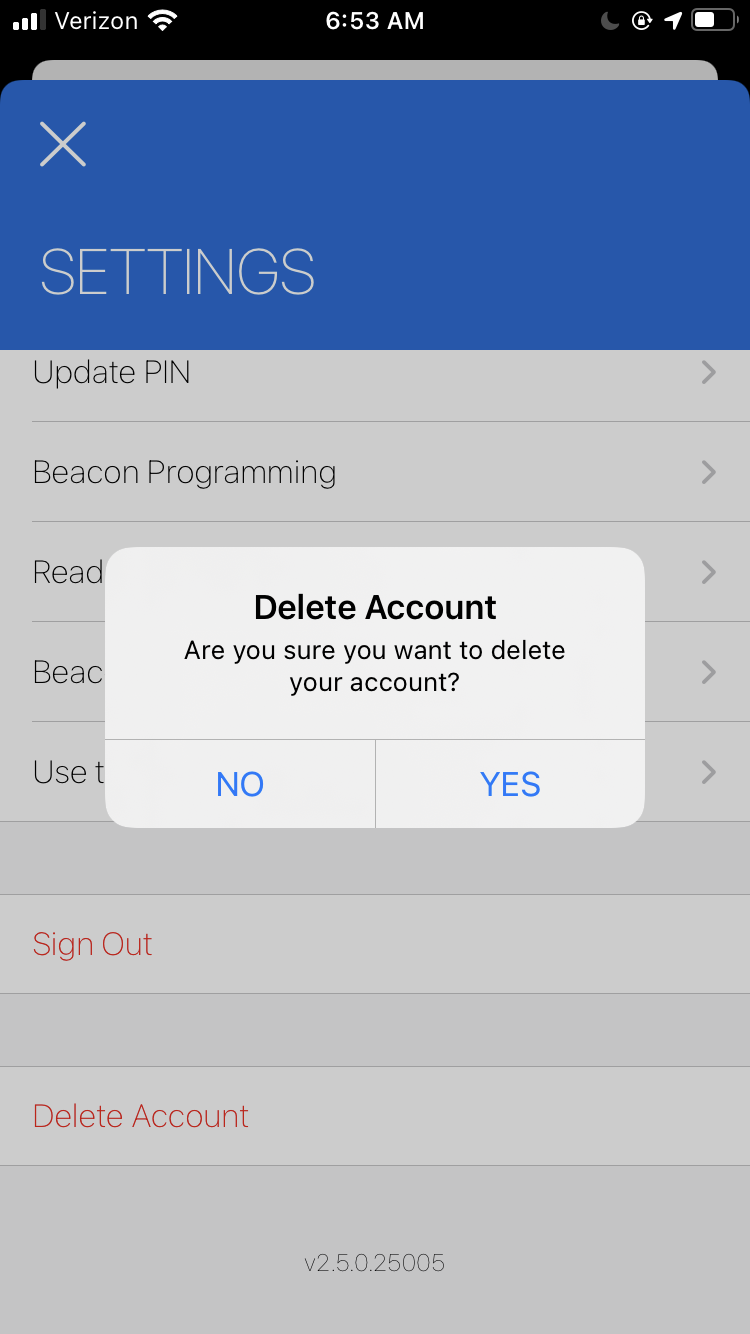
Delete your account
Tapping on the profile menu item will display the EDIT PROFILE screen:
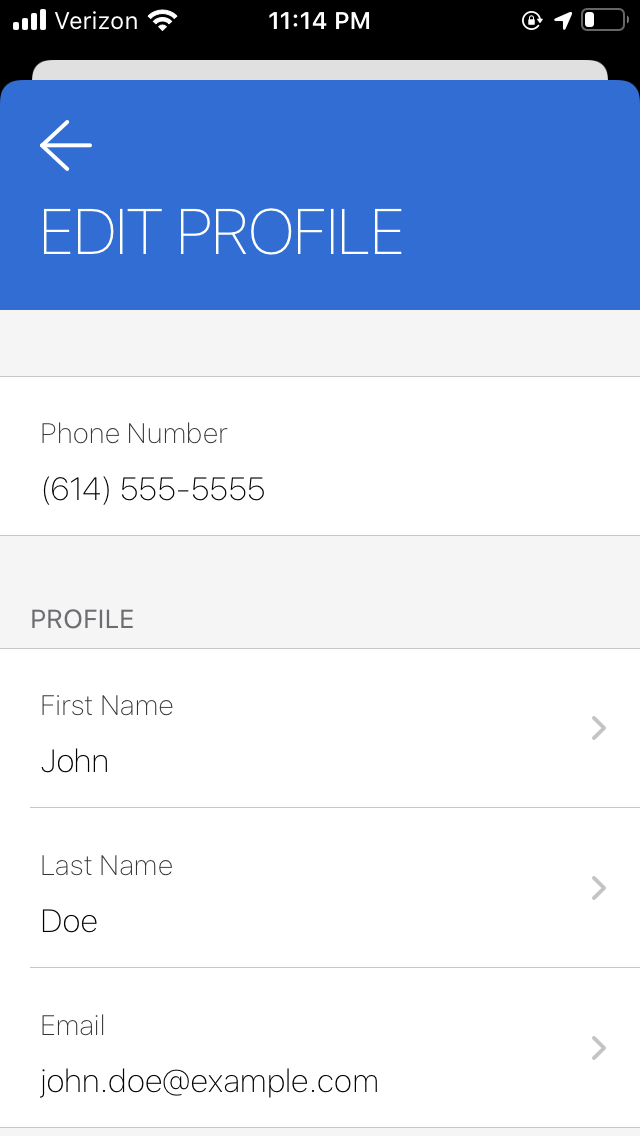
Here you can change your First Name, Last Name,
or Email using the same screens as documented in Device Enrollment.
Changes will be made immediately once you tap the arrow in the upper left.
If you want to undo your changes before returning, tap the to restore the attribute to
its original value.
QuickLifts are used to quickly call an elevator for the selected destination. There are two ways to use QuickLifts. The first is to long press on the LiftOff icon on the home screen when in an elevator lobby, rather than tapping on it to launch LiftOff. A menu of relevant destinations will be displayed, and you can then call an elevator by making a destination selection.
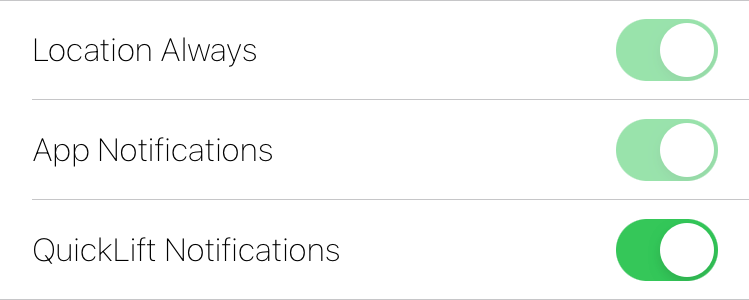
The second mechanism by which you can call an elevator with QuickLifts is to receive the QuickLifts as a push notification. To receive the notification, location services must be set to Always and QuickLift Notifications must be enabled:
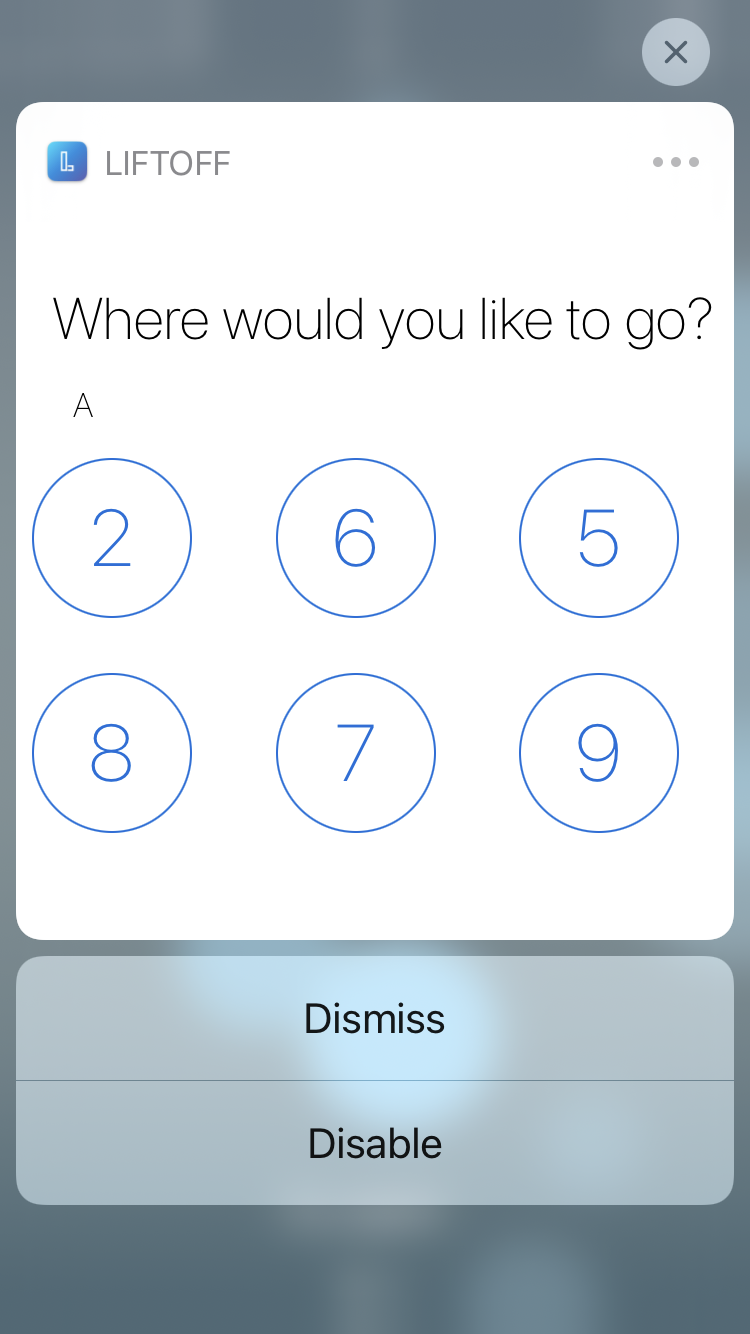
As you approach the elevators, you will receive a push notification on your device:

Tapping the notification will launch LiftOff. Long pressing the notification (touching, but not releasing), will
open the QuickLifts menu of relevant destinations:
The destinations displayed are composed of:
Lobby floor
Favorite floor
Recent destinations
Popular destinations
You can ignore the menu by tapping the button. You can also turn off receiving QuickLift Notifications by tapping the Disable button. You can always re-enable QuickLift Notifications by toggling it back on in the panel of LiftOff.
![[Note]](images/note.png) | Note |
|---|---|
| Even if you have QuickLift Notifications enabled in LiftOff, a building may have this function disabled. |
AutoLifts allow you automatically call an elevator car without the LiftOff app running. For instance, if you typically arrive at the building each day between 7:30 AM and 8:00 AM, and travel to the same destination, you can create an AutoLift for a "key-less entry" experience. As you approach the elevator lobby, one of two things will occur:
A car with be called automatically, and you will receive a push notification of where to proceed
You will receive a push notification asking you to first confirm the call to your destination, after which a call to your destination will be placed and the car allocation displayed
Whether or not you are first asked to confirm the call is determined by the Confirm setting in the AutoLift.
| Note |
|---|---|
Any given AutoLift is in effect once per day. Once you call a car or cancel the confirmation, that specific AutoLift will not trigger again until the next day. You can, of course, create as many AutoLifts as you'd like. |
| Note |
|---|---|
For AutoLifts to work when LiftOff mobile is not running, needs to be set to Always. LiftOff mobile will not consume much battery life, even when is set to Always because LiftOff mobile only does work when you are near a LiftOff enabled elevator lobby. In addition, to receive the notifications, needs to be enabled, and disabled. |
There are two ways to create an AutoLift:
Clicking on the button after calling a car directly
Tapping the button (iOS) or choosing the menu item (Android), tapping the menu item, and then tapping the building in which the AutoLift out to be created or edited
If you are navigating to AutoLifts through , you will be presented with a list of AutoLifts that you have already created. You can add new AutoLifts by tapping the icon in the upper right. To delete an existing AutoLift, swipe left on the AutoLift and tap .
The AUTOLIFT screen will prompt you for exactly when and where the AutoLift should take place:
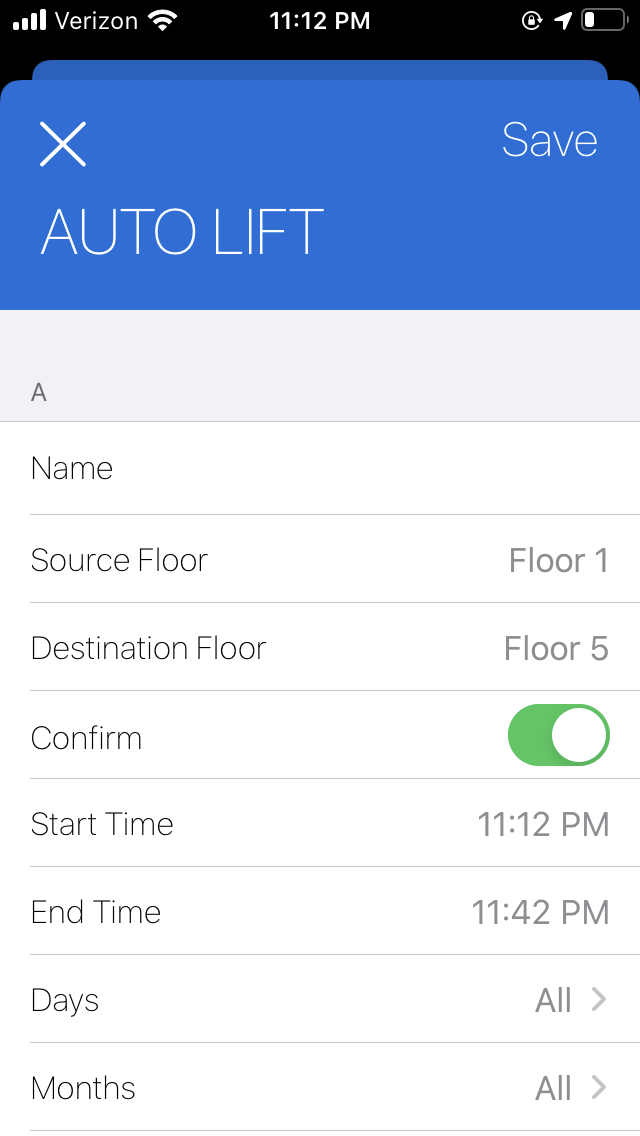
The Name field is required. Tap the Name field to give the
AutoLift a name. It must be unique for the building.
You must choose your source and destination floors when defining an AutoLift. Some source floors may not be available to you, depending upon building administrator preferences. For example, if turnstiles in the lobby are already calling your home floor for you, your building administrator may be disabled the ability to create an AutoLift for execution in the lobby.
The Confirm toggle determines whether or not you are asked to confirm the AutoLift before having the call for the elevator placed. It may be disabled and locked to on, depending upon building administrator preferences.
The Start Time and End Time are used to determine when the AutoLift is in effect, and the start must always be earlier than the end. If you want to have an AutoLift occur across midnight, you can create two AutoLifts to achieve the same effect.
The Days, Months, Days of Week options are used to further restrict the window of time the AutoLift is in effect. After tapping on any of those options and making a selection, swipe down to dismiss the options list.
Once you are done with configuring your AutoLift, tap the button to save it.
When approaching an elevator lobby during a window of time when an AutoLift is in effect, if LiftOff mobile is in the background, you will receive a push notification. If Confirm is not enabled on the AutoLift, the push notification will tell you which car to proceed to:

If LiftOff is in the background and Confirm is enabled, you will receive a push notification that will ask you to confirm the call:

If you hard-press on the notification, you can confirm the call without launching LiftOff:
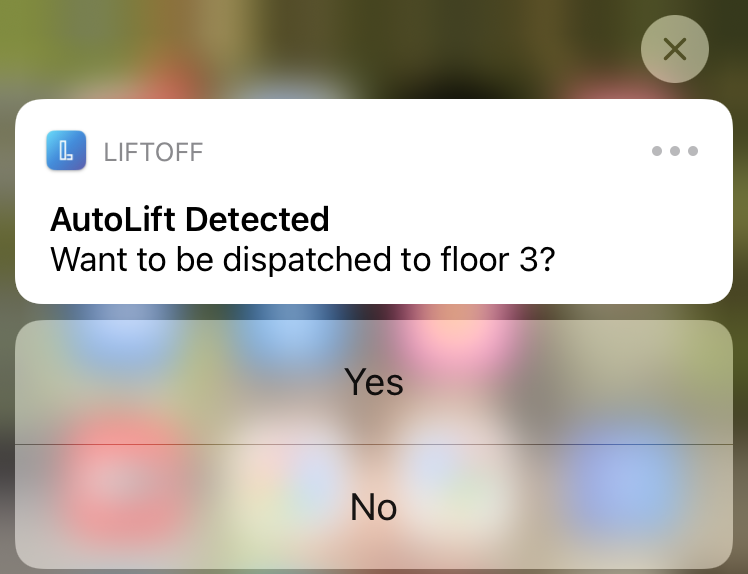
If you tap the notification, LiftOff mobile will launch and ask you to confirm the call:
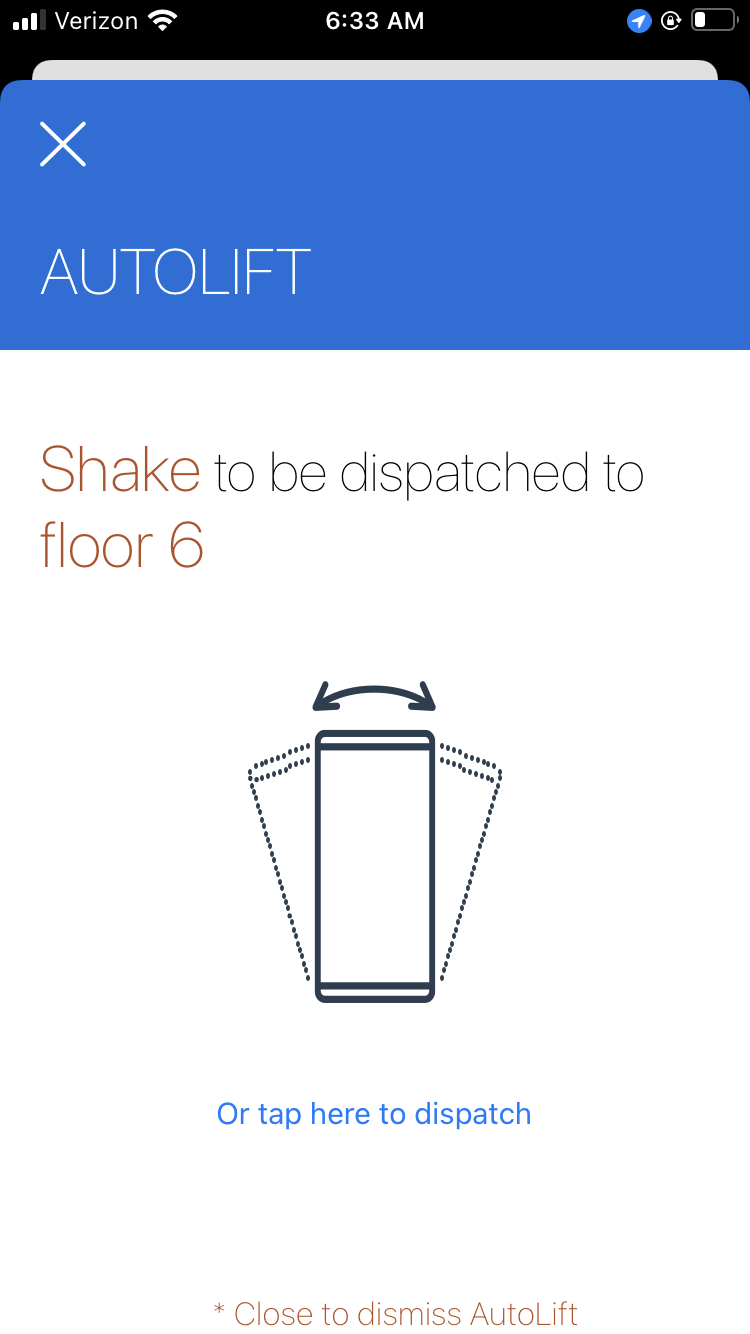
Shaking the phone or tapping the link will call the elevator
car. Tapping the close button (X on iOS) will dismiss the AutoLift without placing a
call.
If one of the buildings you use wants to maintain your accessible destinations in a security system, you will need to verify the email address you are using with LiftOff. LiftOff will send an email to the email address in the security system with a verification code. You can then enter that code here to complete the verification:
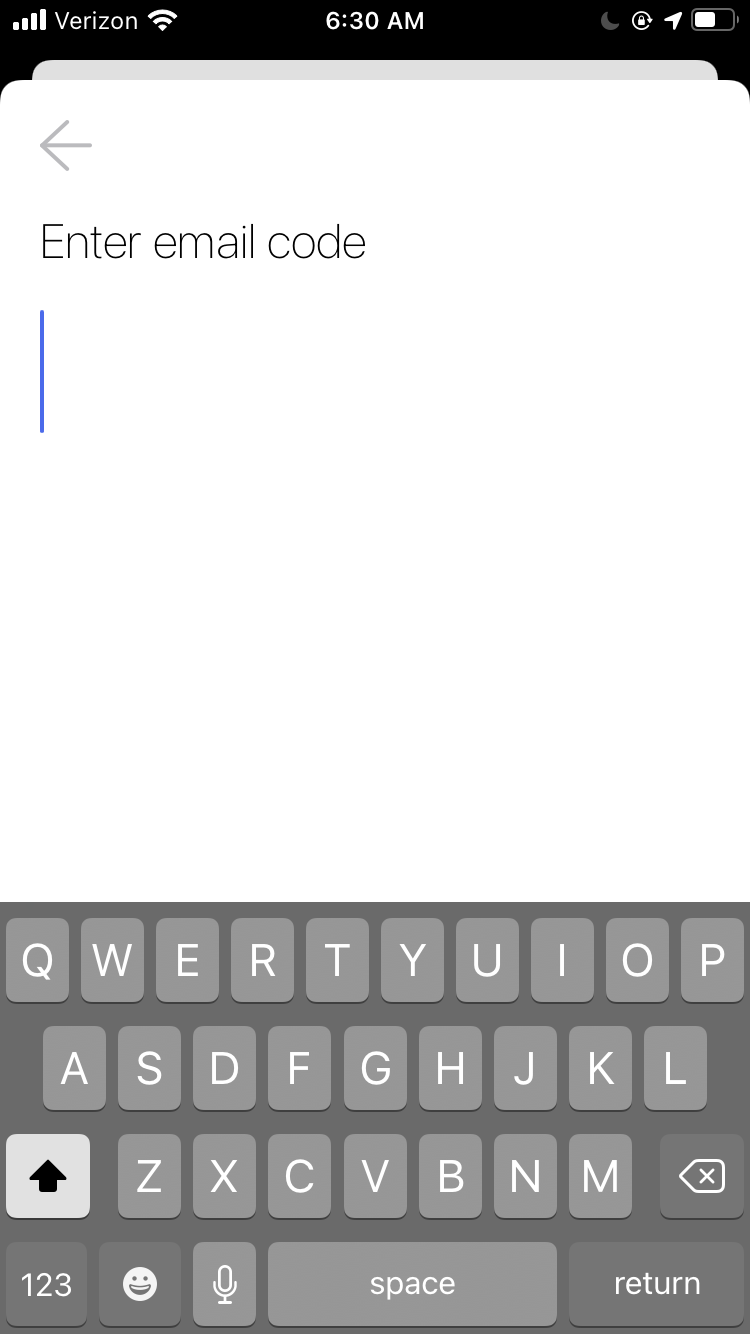
The verification code is valid for 30 minutes. Once you have verified the email address once,
you will not have to verify it again for another building if you use the same email address there.
Two different email addresses cannot be used with the same device.
If you'd like to "Sign Out" of the LiftOff application, you can tap the menu item from Settings. The next time you launch LiftOff, you will be asked to re-perform the SMS verificiation. You will automatically be signed-out once every six months.